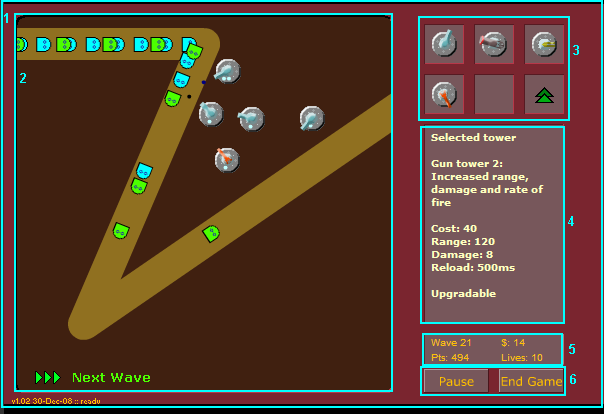
A game in play, with first level components highlighted
This is the first in a series of articles explaining the issues involved in writing a simple tower defence game. You can find the completed game on Kongregate, here. This article assumes that you understand the basics of the Flash/SWF object model, and ActionScript. (If you don't, you should follow the Shootorial series at Kongregate Labs, or another from-scratch tutorial.)
This article produces a canvas onto which the active gameplay will be added in article 2, and embellishments added to produce a finished game in article 3. If you want to follow through the steps in a tutorial fashion and produce a working game, you should read through all three articles. If you are an experienced game maker and you want to look for new techniques (or criticise mine ...) you probably don't need to start until the beginning of the second part.
I use the MTASC and SWFmill free SWF building path outlined in this thread. If you use a different approach, for example if you have the expensive Flash program from Adobe, you will have to build an equivalent object model instead of using the SWFmill XML format as I do. I use ActionScript 2.0.
I organise my work into three groups:
You do not need to copy this (there is nothing special about it) but if you do not you will need to modify your build files accordingly.
All games have some common elements: a menu, a game over screen and a play area. In this game, and many games of this type, there is a panel which is always visible, within which the play area, menu and game over screen are shown, and on which is a collection of gameplay widgets.
A game in play, with first level components highlighted
In the diagram I have indicated the top level components.
The version text (lower left) is also a top level element, but is not important for this discussion (it is not interacted beyond the onLoad of App anyway). Thus, we can create an initial XML document to begin development from don't panic, this is probably the single largest wall of code in the whole series, as it introduces stubs for most elements:
<?xml version="1.0" encoding="iso-8859-1" ?>
<movie version="8" width="600" height="400" framerate="30">
<background color="#000000"/>
<frame>
<clip import="out/Classes.swf"/>
<library>
<!-- Basic resources -->
<textfield id="PanelText" text="Infinite TD
Press ‘Start’ to start a game" font="BaseFont" width="130" height="200" size="10" color="#FFFFc0"/>
<clip id="PauseButton" class="PauseButton"/>
<clip id="EndGameButton" class="EndGameButton"/>
<clip id="Map" class="Map" width="400" height="400" />
<clip id="Panel" class="Panel" import="res/panel.png"/>
<clip id="InfoPanel" class="InfoPanel"/>
<clip id="TowerButtons">
<frame>
<!-- The individual buttons will go here -->
</frame>
</clip>
<clip id="Menu" class="Menu" import="res/menu.png"/>
<clip id="GameOver" class="GameOver"/>
<clip id="App" class="App">
<frame>
<place id="Map" name="map" depth="16385" />
<place id="Menu" name="menu" depth="16500" x="0" y="0"/>
<place id="GameOver" name="gameover" depth="16501" x="0" y="0"/>
<place id="Panel" name="panel" depth="17000"/>
<place id="TowerButtons" name="buttons" depth="17501" x="400" y="0"/>
<place id="PanelText" name="paneltext" depth="17502" x="425" y="125"/>
<place id="InfoPanel" name="infopanel" depth="17001" x="420" y="330"/>
<place id="PauseButton" name="pausebutton" depth="17002" x="420" y="365" />
<place id="EndGameButton" name="endgamebutton" depth="17003" x="495" y="365" />
</frame>
</clip>
</library>
<place id="App" name="app"/>
</frame>
</movie>
(Image assets used: panel.png, menu.png)
You can see how the structure of the App clip type matches the visible structure above, and the other entries above that are stubs for the clips which go inside it. If you place menu.png in the res subfolder, you should see that within the window when you compile and run. The text in the information panel to the right will be there, but all the other widgets will be missing. (The indentations are simply part of the image.) In my model the play area (Map) is always visible, but the menu and game over screen overlay it; this allows them to be semi-transparent and other graphical effects, and I recommend it.
As yet, we have not written any script, and therefore what we have is a one frame, non-interactive 'movie'. In the App class (which is attached to the App clip; I maintain this naming convention and attachment to the clip of the same name can be assumed unless stated otherwise), we want to place some utilities we will add to this later, but for now create an App.as and add to it:
// Non-OO information and global settings, timers etc
class App extends MovieClip {
	var frameno = 0, framerate = 30;
	var map, infopanel, paneltext;

	var shakeeffect = 0;

	function onEnterFrame(){
		frameno++;
	}

	function onLoad(){
		paneltext.selectable = false;
	}
}
Flash doesn't appear to give us frame rate and count information itself, so we set up fields to keep track of that, and update the frame number each frame. And as SWFmill doesn't allow you to create unselectable text fields in the XML, we set that property in the onLoad. Anything that we want to happen at the beginning (for example injection of methods into _root so they are available everywhere) will be placed in this onLoad, and any data which we want to be available everywhere such as the frame index will become fields in App.
The visible result of this script will be very slight (the panel text will no longer be selectable), but it is a very good idea to compile and run at this stage, so you can be sure that your ActionScript compilation is working correctly and successfully ending up in your game.
For the menu, you will notice there are currently no buttons. For my buttons I use a custom class, GlowButton, which provides a glowing effect so create a GlowButton.as class file:
// General purpose button
class GlowButton extends MovieClip {
	var glowFilter, textfield;

	function onRollOver(){
		if(!glowFilter)
			glowFilter = new flash.filters.GlowFilter(0x00C0FF, 80, 32, 32);
		this.filters = [glowFilter];
	}

	function onRollOut(){
		this.filters = [];
	}

	function init(text){
		textfield.autoSize = 'center';
		textfield.wordWrap = false;
		textfield.text = text;
		textfield._y -= 0.5*textfield._height;
		textfield.selectable = false;
	}
}
The roll-over and roll-out handlers handle the glowing effect when the mouse is over the button. Colours in ActionScript are 24 bit hex numbers, so the default colour is a bluish aqua; feel free to look up more about filters if you're interested. The init method will be called to set the text on each button. Of course we need to add a clip to attach this class to and it should have a text field called textfield. Here's the extra XML (put it in the <library> section, as with all snippets I will give you):
      <!-- Menu buttons -->
      <textfield id="MenuText" text="(button caption)" font="BaseFont" size="14" width="0" height="50" color="#00FFFF"/>
      <clip id="MenuButtonImage"  import="res/menubutton.png"/>
      <clip id="MenuButton" class="GlowButton" >
        <frame>
          <place id="MenuButtonImage" name="image" x="-125" y="-30" depth="1"/>
          <place id="MenuText" name="textfield" x="0" y="-10" depth="2"/>
        </frame>
      </clip>
Note that the clip is called MenuButton, but uses the GlowButton class. This is because we will want to use GlowButton in different contexts, without the menu button image. (You need the resource menubutton.png or a similar image.)
It is possible to create a menu simply by adding subelements to the Menu entry, and attaching event handlers individually to each button. However, as we need code anyway to attach the event handlers, I prefer to dynamically create the menu. For now, let's simply create one button that starts the game. Create a Menu.as, to fill in the Menu class already referred to:
// Menu
class Menu extends MovieClip {
	function onLoad(){
		var startButton = attachMovie('MenuButton', 'start', 1);
		startButton._x = 200;
		startButton._y = 130;
		startButton.init('Start Game!');
		var menu = this;
		startButton.onRelease = function(){
			menu._visible = false;
			_root.app.map.initGame(0x402010, 0x907020);
		}
	}
}
Don't worry about the initGame method call for now we'll fill in the Map class and its initGame method later. This code is fairly simple, adding a new movie clip of type MenuButton (which we just defined) at depth 1. The one interesting technique here is assigning this into a local variable, and referencing that in the event handler you dynamically attach within the handler code, this refers to the newly created button. You should now be able to see a button, and when you click it the menu should disappear.
The final piece of background work we need to do before the game programming can begin in earnest is to write a little code to initialise and draw the map. It is possible to define the map for a TD game entirely statically, and draw an image that works with it. However, constructing and drawing the entire map dynamically is more flexible, and a good introduction to the AS drawing capabilities. (I will make heavy use of those later.)
Create yourself a Map.as, and add to it initialisation and drawing code:
class Map extends MovieClip {
	var path = [];
	var w = 400, h = 400;

	function initGame(mapCol, pathCol){
		createPath();
		draw(mapCol, pathCol);
	}

	function createPath(){
		path = [[0,40],[200,40],[80,320], [400,100]];
	}

	function draw(mapCol, pathCol){
		clear();
		lineStyle(0,0,0); beginFill(mapCol);
		moveTo(0,0); lineTo(w,0); lineTo(w,h); lineTo(0,h); endFill();

		lineStyle( 32, pathCol, 100 );
		moveTo(path[0][0], path[0][1]);
		for(var i = 0; i < path.length; i++){
			lineTo(path[i][0], path[i][1]);
		}
	}
}
You could place all the code within initGame, but it is going to have a lot of state-setting code added to it later and it seems right to separate the path creation and drawing out as they are clearly separate tasks. createPath is a static placeholder (the classic path as seen in the initial version of Infinite TD), but you can add randomisation or a choice of paths easily.
The drawing code is simple enough path segments are simply lines. The one point of interest is that you should not use ActionScript's for ... in construct if you want to work through a list in order, as there is no guarantee that you will get the elements in the right order.
You should now be able to start up your game, click the Start button on the menu and see a brown path on a green background, as in the finished game.
That's the end of the first article. If you've got to this point, you have the framework in place, within which you can place almost any game. You also have the beginnings of the tower defence game a path. In the next article, I'll introduce the interactive parts of the game creeps, towers and the movement code. Your code should look something like this.